SPF and DKIM for Salesforce: Authenticating Your Sender Domain
Salesforce handles DKIM differently from most email platforms covered in this series (see the Microsoft 365, Google Workspace, and SendGrid guides): key generation and management happen almost entirely inside Salesforce Setup rather than through a third-party dashboard, and the DNS work is limited to publishing CNAME records that Salesforce generates for you. This guide covers that process end to end.
Salesforce also enforces this more strictly than most platforms — it has published compliance deadlines requiring authenticated sending domains, making this less optional than it might be with other platforms. If you're managing several Salesforce orgs as part of a broader MSP customer base, this is worth prioritizing accordingly.
What you will learn:
- How to create a DKIM key in Salesforce Setup
- The CNAME records Salesforce generates and how to publish them
- How SPF fits alongside Salesforce's DKIM-centric approach
- Common mistakes specific to Salesforce setups
Step 1: Create a DKIM key in Salesforce Setup
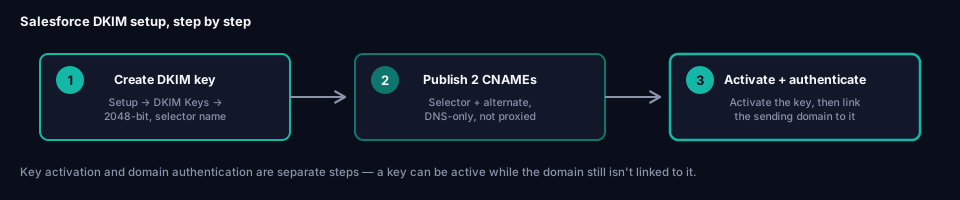
In Salesforce Setup, search for DKIM Keys in the Quick Find box, and select it. Click Create New Key.
You'll be asked to choose a key size — select 2048-bit for current security standards; shorter key lengths are available for legacy compatibility but shouldn't be used for a new setup. You'll also assign a selector name (an arbitrary label, commonly something like sfdc or a custom value of your choosing) and an alternate selector for a second key used during rotation.
Selector:            sfdc1
Alternate selector:  sfdc2
Salesforce also asks for the domain this key applies to — this should match the domain you'll be sending from, not necessarily your organization's primary corporate domain if Salesforce mail is sent from a dedicated subdomain.
Step 2: Salesforce publishes its own TXT records internally
Once created, Salesforce publishes the private key material to its own internal DNS records — this part requires no action from you. After this internal publishing step completes (Salesforce indicates when this is done, typically within about 15 minutes), the CNAME Record and Alternate CNAME Record fields appear in the DKIM key detail page, showing you what to publish in your own DNS.
Step 3: Publish the CNAME records in your DNS
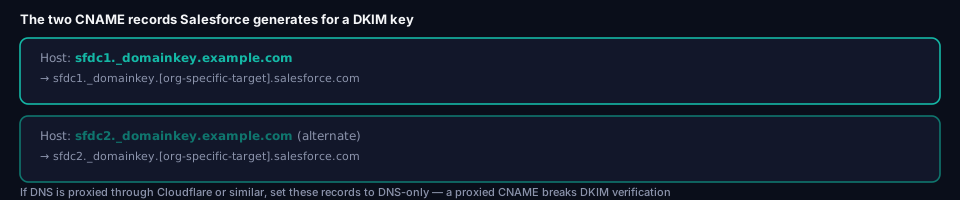
Salesforce displays the exact host and target values to use — copy them precisely rather than reconstructing them, since the target values are specific to your org and key. They follow this general pattern:
Host:  sfdc1._domainkey.example.com
Type:  CNAME
Value: sfdc1._domainkey.[your-salesforce-specific-target].salesforce.com
Host:  sfdc2._domainkey.example.com
Type:  CNAME
Value: sfdc2._domainkey.[your-salesforce-specific-target].salesforce.com
If your DNS is proxied through a service like Cloudflare, make sure these CNAME records are set to DNS-only (not proxied) — a proxied CNAME for a DKIM record typically doesn't resolve the way the receiving mail server expects, causing DKIM to fail even though the record looks correct in your DNS panel.
Step 4: Activate the DKIM key
Back in Salesforce Setup, once the CNAME records have propagated, activate the key from the DKIM Keys list. Salesforce verifies the CNAME records resolve correctly before allowing activation — if it fails, double-check you've copied the target values exactly and that DNS propagation has completed.
Step 5: Authenticate the sending domain
DKIM key activation alone doesn't complete the picture — Salesforce also requires the sending domain itself to be set up and verified as an Authenticated Domain (or, in older configurations, associated with your organization-wide email settings). In Setup → Email → Sender Authentication Package or the equivalent domain configuration screen for your Salesforce product (Marketing Cloud, Sales Cloud, etc. — the exact location varies), confirm the domain is linked to the DKIM key you just activated.
Salesforce products vary somewhat in exactly where this configuration lives — Marketing Cloud, for instance, manages sending domains through its own domain configuration flow distinct from core Sales Cloud settings — so check your specific product's documentation for the precise menu path if it doesn't match exactly what's described here.
SPF for Salesforce
Salesforce's authentication setup centers on DKIM, but SPF still matters for full alignment — DMARC only requires one of the two to align, but having both configured is more resilient, particularly since SPF doesn't survive mail forwarding.
If Salesforce is sending mail as your domain via its own infrastructure, check your specific product's SPF requirements — this typically means adding a Salesforce-provided include to your SPF record, distinct across products (Marketing Cloud in particular has its own sending infrastructure separate from core Salesforce). Combine whatever Salesforce specifies alongside your other platforms' includes in a single record, since a domain can only have one SPF record — see Every SPF Mechanism Explained for how to combine multiple includes correctly, and check your current total lookup count with the SPF Analyzer before adding another.
Verifying your setup
Check the DKIM CNAMEs
dig CNAME sfdc1._domainkey.example.com +short
dig CNAME sfdc2._domainkey.example.com +short
Both should resolve to the Salesforce-specific targets shown in your DKIM Keys setup page.
Confirm activation status in Salesforce
The DKIM Keys list in Setup shows an Active status once verification succeeds — don't consider the setup complete until this shows active, not just "CNAMEs published."
Send a real test
Send a test email through whichever Salesforce product is configured (a test campaign, a workflow email, etc.) to a mailbox where you can inspect headers, and confirm dkim=pass with a d= value matching your domain.
Common mistakes with Salesforce
Proxying DKIM CNAME records through a CDN or security layer. If your DNS provider offers a "proxy" toggle (common with Cloudflare), DKIM CNAME records must bypass it — proxying breaks DNS resolution behavior the DKIM verification process expects.
Activating the key before CNAME records have propagated. Salesforce's verification will simply fail and can typically be retried once propagation completes — not a sign of a fundamentally broken configuration, just a timing issue.
Confusing DKIM key activation with domain authentication. These are two separate steps in Salesforce — a DKIM key can show as active while the sending domain itself still isn't correctly linked to it, meaning mail still won't authenticate correctly end to end.
Missing product-specific requirements. Marketing Cloud, Sales Cloud, and other Salesforce products each have their own sending infrastructure and setup nuances — don't assume a guide (including this one) written at a general level covers every product-specific detail; check your specific product's current setup screens.
Frequently asked questions
What key size should I choose in Salesforce's DKIM setup?
2048-bit, for current security standards. Shorter key lengths exist for legacy compatibility but aren't recommended for a new setup.
Why do DKIM CNAME records need to bypass my CDN's proxy?
Proxied DNS records route resolution through the CDN's infrastructure rather than returning the direct DNS answer a receiving mail server expects when verifying a DKIM signature — this typically breaks verification even though the record appears correctly configured in your DNS panel.
Does activating a DKIM key automatically authenticate my sending domain?
No — these are separate steps. Key activation confirms the CNAME records resolve correctly; domain authentication is a separate configuration step linking your actual sending domain to that key.
Do I need SPF if I've already configured DKIM correctly in Salesforce?
Not strictly, since DMARC only requires one of SPF or DKIM to align. But relying on DKIM alone means losing alignment if a signature ever breaks — for example, through a forwarding path that alters message content. Configuring both gives you a more resilient setup.
Next steps
Once your DKIM key shows active and the sending domain is confirmed authenticated, check your domain's overall authentication status with grimDMARC's free Domain Scanner. If you're coordinating Salesforce authentication alongside other business platforms toward a full DMARC rollout, What is DMARC? covers the complete sequence from monitoring to enforcement.
About this guide
This guide was written by the team building grimDMARC — a managed DMARC and SPF platform for MSPs and their customers. If you have questions about Salesforce authentication or feedback on this guide, reach us at hello@grimdmarc.com.
Last updated: August 2026 Reading time: 9 minutes Reviewed by: grimDMARC team