SPF and DKIM for SendGrid: Domain Authentication Setup Guide
SendGrid handles SPF and DKIM together under a single feature called Domain Authentication, rather than treating them as two separate setup steps. Instead of a plain SPF include and a separate DKIM key, SendGrid issues a set of CNAME records that cover both. This guide walks through exactly what those records do and how to verify the setup worked.
If this is part of a broader DMARC project, see What is DMARC? for the full sequence — SendGrid should be fully authenticated before DMARC moves past monitoring mode.
What you will learn:
- What SendGrid's Domain Authentication CNAME records actually do
- The exact naming pattern and how to add them to your DNS
- How to verify authentication succeeded in SendGrid's dashboard
- Common mistakes specific to SendGrid setups
Why SendGrid uses CNAMEs instead of a plain SPF include
Most platforms give you a static include: value to add to your SPF record. SendGrid takes a different approach with Domain Authentication: it generates a small set of CNAME records unique to your account, one of which handles SPF-equivalent authorization by routing your subdomain through SendGrid's infrastructure, and two of which publish DKIM keys. This means SendGrid doesn't require you to add anything to your existing v=spf1 record at all — authentication happens entirely through the CNAMEs.
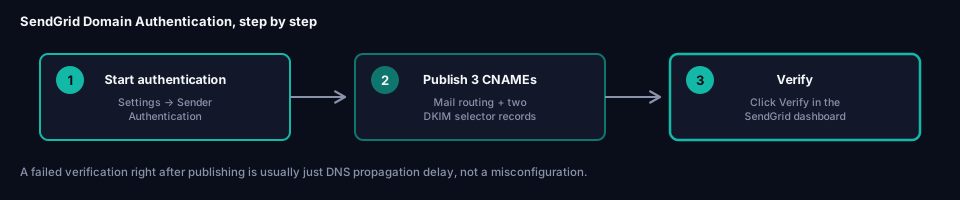
Step 1: Start Domain Authentication in SendGrid
In the SendGrid dashboard, go to Settings → Sender Authentication → Authenticate Your Domain, enter your sending domain, and choose whether to enable "automated security" (recommended — this is what generates the CNAME-based setup covered here, as opposed to manually managing SPF and DKIM records yourself).
SendGrid then generates three unique CNAME records for your account.
Step 2: Publish the three CNAME records
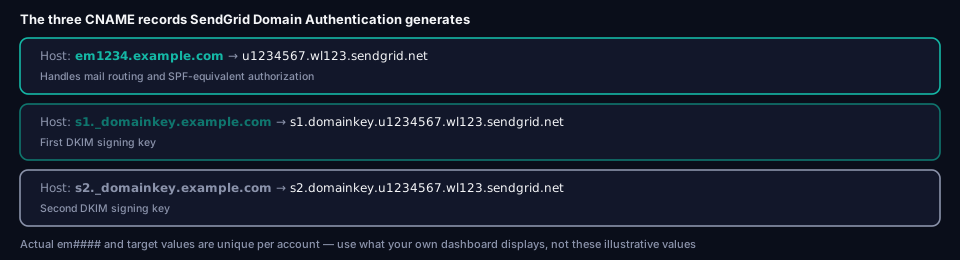
The exact values are unique per account, but they follow this pattern:
Host:  em1234.example.com
Type:  CNAME
Value: u1234567.wl123.sendgrid.net
Host:  s1._domainkey.example.com
Type:  CNAME
Value: s1.domainkey.u1234567.wl123.sendgrid.net
Host:  s2._domainkey.example.com
Type:  CNAME
Value: s2.domainkey.u1234567.wl123.sendgrid.net
The first record (em1234 — the actual subdomain SendGrid assigns will be different for your account) handles mail routing and SPF-equivalent authorization. The two s1._domainkey and s2._domainkey records publish DKIM signing keys, following the same selector-based pattern covered in Every DKIM Attribute Explained.
Important: enter only the host portion (em1234, s1._domainkey, s2._domainkey) at most DNS providers — the domain gets appended automatically. Pasting the full em1234.example.com into a provider that also appends the domain produces a broken, doubled hostname.
Step 3: Verify in the SendGrid dashboard
Back in Sender Authentication, click Verify. SendGrid checks that all three CNAME records resolve correctly and reports success or a specific error for whichever record isn't propagating yet. DNS changes can take anywhere from a few minutes to a few hours to propagate, so a failed verification immediately after publishing isn't necessarily a misconfiguration — it may just need more time.
Verifying your setup independently
dig CNAME em1234.example.com +short
dig CNAME s1._domainkey.example.com +short
dig CNAME s2._domainkey.example.com +short
Each should resolve to the corresponding sendgrid.net target SendGrid displayed during setup.
For a real-world check, send a test message through SendGrid to a mailbox where you can inspect full headers, and confirm spf=pass and dkim=pass appear in Authentication-Results, with the d= domain matching your own — not sendgrid.net. See Alignment vs Authentication for why that distinction matters for DMARC specifically.
What this means for your SPF record
Because SendGrid's Domain Authentication routes mail through the em1234.example.com subdomain rather than requiring a traditional include:sendgrid.net in your root domain's SPF record, some setups won't need any change to your main SPF record at all. If you're using SendGrid's older, non-domain-authenticated sending method instead, or a legacy integration, you may still need:
include:sendgrid.net
added to your SPF record directly. Domain Authentication is the current, recommended approach — if you're setting up SendGrid for the first time, use it rather than the older manual include-based method, since it also handles DKIM, not just SPF.
Common mistakes with SendGrid
Skipping automated security and configuring records manually. SendGrid's "automated security" option handles key rotation on the backend automatically. Opting out and managing SPF/DKIM manually forgoes that benefit for no real advantage in most setups.
Publishing records at the wrong host level. As with any CNAME-based setup, whether to include the domain suffix depends on your specific DNS provider's convention — check with a dig query if verification fails unexpectedly.
Using a subdomain for sending but authenticating the root domain, or vice versa. If you send from mail.example.com specifically, make sure the domain entered during SendGrid's Domain Authentication setup matches what's actually in your From address — a mismatch here breaks alignment even if every CNAME resolves correctly.
Forgetting link branding is separate. SendGrid also offers "link branding" for tracked links in emails, which uses its own separate CNAME record. It's unrelated to SPF/DKIM authentication and optional — don't confuse it with the domain authentication records covered here.
Frequently asked questions
Does SendGrid require changes to my existing SPF record?
Not necessarily, if you use Domain Authentication with automated security — it handles authorization through its own CNAME records rather than requiring a traditional include:sendgrid.net addition. Older, manually configured SendGrid integrations may still rely on that include.
What does the em1234 subdomain actually do?
It's a SendGrid-managed subdomain unique to your account that mail is routed through, allowing SendGrid to handle both SPF-equivalent authorization and mail delivery infrastructure through one mechanism, rather than requiring a separate SPF include.
Can I use SendGrid alongside Microsoft 365 or Google Workspace?
Yes. If Domain Authentication doesn't require SPF changes for SendGrid specifically, your existing SPF record for your primary platform (Microsoft 365, Google Workspace, etc.) stays as-is. If you are using the older manual SendGrid setup requiring include:sendgrid.net, add it alongside your other platform's include in the same record.
Why did verification fail immediately after I added the records?
Most likely DNS propagation delay — this can take anywhere from minutes to a few hours depending on your DNS provider and the TTL on the records. Wait and retry verification before assuming something is misconfigured.
Next steps
Once SendGrid shows verified authentication, confirm your domain's overall authentication status with grimDMARC's free Domain Scanner, and check your total SPF lookup budget with the SPF Analyzer if you're combining SendGrid with other sending platforms. From there, What is DMARC? covers moving your policy from monitoring to enforcement once every legitimate sender, including SendGrid, authenticates correctly.
About this guide
This guide was written by the team building grimDMARC — a managed DMARC and SPF platform for MSPs and their customers. If you have questions about SendGrid authentication or feedback on this guide, reach us at hello@grimdmarc.com.
Last updated: August 2026 Reading time: 8 minutes Reviewed by: grimDMARC team